Chess deflection

Learn how to use deflection in chess
Deflection is a widely used tactical procedure. It is a maneuver that seeks to guide away an enemy piece, which defends a position, in order to perform a checkmate or win a piece.
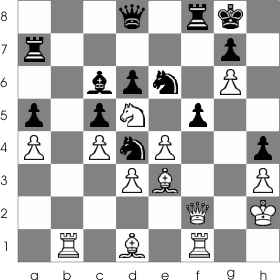
You can see in the next game a simple example of how deflection is made. As you can see, White is under the threat of being checkmate on the back-rank; the only thing stopping this is the presence of the white rook form c1. Black moves 1... Qc2. With this move he is trying to deflect the rook from the 1'st rank by sacrificing his queen. This is a simple trick, as any intermediate player could spot the trap behind the move. The right move White must do, is 2. Qe1. This way he'll prevent the black rook from moveing at d1.
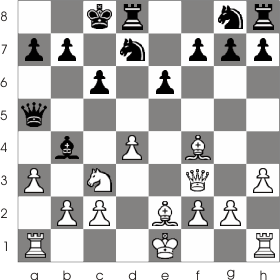
This next deflection is not so obvious. The game was played in 1934 between Esteban Cajal and an amateur. Black just castled on the queen side. This gave White the opportunity to perform a superb combination: 1.a:b4 Q:a1+ 2.Kd2 Q:h1. By giving away his two rooks, White lured the black queen away from file 'e'. After that followed yet another sacrifice 3. Q:c6 which forced the 3... B:c6 and then 4. Ba6 checkmate. This was yet another perfect example of how tactical maneuvers bring out the best in chess.
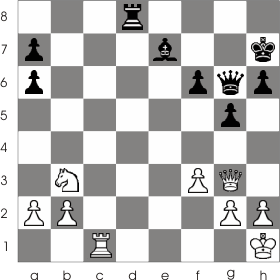
In this next game (Botvinnik-Keres [1996]) White could perform checkmate at h6 with the queen if he were to get his queen on the 'h' column. But, as you can see, he is stopped from doing that by the pawn from h4 which is protected by the queen from d8. White moves 1. Rb1-b8 and now the queen is forced to give up the pawn because it has no where to move on the d8-h4 diagonal.