Forcing stalemate.

Forcing stalemate
This tactical procedure is used by the side which has the disadvantage and it usually involves a piece sacrifice. A player uses this maneuver when he realizes that he has no chance of recovering the gap between himself and the opponent.
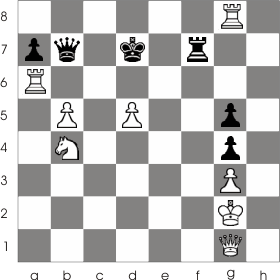
Black is in a lot of trouble.
White has an extra knight and rook and the pawns from b5 and d5
are dangerously close to the promotion squares. But Black has the resources
to end the game a draw. He moves 1....Q:d5!. White is forced to
capture the queen 2. N:d5 (otherwise after the white king would
move on the h column 3...Rh7  ).
You can see now that the king would be stalemate if it weren't for the rook
at f7, but that can be easily fixed: 2... Rf2+ 3.Kh1 Rh2+ 4.Q:h2
and now Black is not able to move any of the piece.
).
You can see now that the king would be stalemate if it weren't for the rook
at f7, but that can be easily fixed: 2... Rf2+ 3.Kh1 Rh2+ 4.Q:h2
and now Black is not able to move any of the piece.
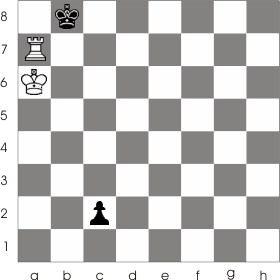
Do you think is possible for
White to end the game a draw? White has its turn to move. You can see that
the black pawn is one square away from being promoted and that the white
rook can't stop it by moving at c7. The answer is 'yes' and comes
in the form of a very ingenious maneuver. 1. Rb7+ Kc8 (if 1...
Ka8 than 2. Rg7 Qc1 3. Rg8+ Qc8 4. R:c8)
2. Rb5 Qc1 3. Rc5+ Q:c5 stalemate.